How to Print to the Edge of Paper
by Anthony Clark
Digital printers come with different features depending on the model and manufacturer. They are typically designed to perform different printing functions and also print on several types of paper. That said, most paper printings are done in such a way that a small area of the paper is left blank. This means the printer won't print on the full page of the printing paper used.
Contents
It is like a default feature that directs printers to leave a blank across the four edges of a paper. The small blank area can be an inch away from the four edges of a paper. This blank area might not allow your documents and images to come out as desired when you print them, which is why people seek ways to print to the edge of the paper. Instructing a printer to print to the edge of the paper is not a difficult task, it only requires changing the print options from default.
You can make use of your home printer to perform edge-to-edge printing on the paper provided you understand how to do it. There are printable margins when creating documents on Microsoft Word, which leads to Word notifying you anytime you tend to print beyond those margins. That said, you might find the need to want your printouts coming out on a full page.
A full-page printout requires printing the content of a document to the edge of a paper. If text and image files are not printed to the edge of the paper, it will make the entire content come out with white borderlines that will make the printout look unpleasant. If your document has unique images or beautiful backgrounds that you want to be captured in the print, you will find yourself dwelling in the thought of a full-page printing.
In situations like this, your instinct will push you to simply drag out the page margins to cover the entire page, or even decide to change the page setup to get rid of the unwanted margins. Good idea, right? It seems so but it doesn't guarantee a quality printout.
What is Edge to Edge Printing?

Edge to Edge printing is the process of conducting borderless printing to the edge of a paper. This means printing text or image files on the entire full page of a paper without leaving blanks.
Printers automatically print files on printer paper with white borders around them, but this can be changed if the printer is configured to perform full-page print through borderless printing.
Printing to the edge of a paper is known as borderless printing and is mostly carried out when you want your text and image files to come out on the full page on a printer paper. In this guide, we will introduce you to the best steps to take if you want to print to the edge of the paper without hassle. These steps are easy to follow and it will not waste your time.
How to Print to the Edge of Paper
Here are steps you need to follow to perform this task;
STEP 1: Check Your Printer Capability
First things first, you have to check if your printer supports edge-to-edge printing. Not every printer is capable of printing to the edge of the paper, so you need to confirm if yours can perform such a task. Here is a good way to determine if your printer is capable;
- Open a new document in Word
- Click on "Page Setup" or "Margins" section under "Layout" to check if you can set the margins
- Check to see if you can change each of the margins from Page Setup to zero (0)
STEP 2: Navigate the Start Menu
After checking your printer capability to ensure it supports printing to the edge of the paper, you can now navigate the start menu on your PC. You will find the start menu icon at the bottom left of the screen if you are running on Windows OS. If you are using Mac, ensure you find it.
STEP 3: Access "Device and Printers" Option
Once you locate and launch the start menu, you should navigate to "Device and Printers" from the series of options displayed. This option will give you access to change the printer preference to carry out the task of printing to the edge of the paper. So, locate the printer icon and right-click.
STEP 4: Select Printer Preference
At this stage, you should go ahead by selecting "Printer Preference" from the menu options. This will give you access to navigate different printer settings options where you will need to set the page layout for your printer. The page layout will give you access to set the margins.
STEP 5: Set Page Layout
At this stage, you can now set the printer page layout by selecting "Page Layout" and setting the margins you want. You will get to change the margin of the document you want to print.
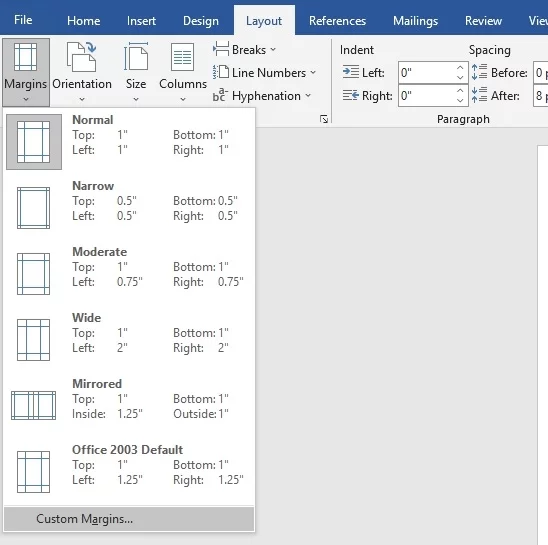
- Select "Page Layout" menu/bar
- Select "Margins" to edit the margins from the dropdown menu
- Select "Custom Margins" to have access to the page setup
- Click "Page Setup" from the group of options
- Set each of the margin's boxes in "Left and Right" to zero (0)
- Set each of the margin's boxes in "Top and Bottom" to zero (0)
- You should also set the "Gutter" box to zero (0) if applicable
- Click the "OK" tab to confirm your changes and close the window
There is a possibility that Word will prompt a warning that your document margins are set beyond the printable area of the page, if this happens it means your computer has a limit. Just select "Fix" to override your Page Setup settings to the acceptable limit for each margin.
STEP 6: Print Your Files
The final step here will be to print your document. Wait for few seconds and your printout will be ready. It is a straightforward process that shouldn't take the time or stress you.
Alternative Method Dedicated for Mac OS
If you are using a MacBook running on Mac operating system, you should follow these steps;
- Select the "File" menu on your Mac
- Click "Print" to open a dialogue box
- Select "Borderless Printing" and change the paper size
- Use the slider to adjust the extension to meet your demands
- Finish the printer setup by clicking "Print" and wait for the process to complete
Alternative Method Dedicated for Windows OS
If you are using a PC running on Windows operating system, you should follow these steps;
- Select the "File" menu on Windows display
- Select "Print Preference" from the File dropdown menu
- Navigate to the "Features" option
- Click the "Paper Size" option
- Select "Borderless" and then go ahead to print your document
YouTube Tutorial Video Links
Visit the YouTube video links for more information on how to print to the edge of the paper.
NOTE: 3 major factors to note if you want to effectively print to the edge of the paper;
1. Ensure the size of the content you are printing does not exceed the size of the paper
2. Ensure you check if your printer supports borderless printing before using it
3. Ensure you change the printer's default size printing to borderless printing
Conclusion
A large percentage of printers sold come with a default that doesn't allow them to print to the edge of the paper. This means users are forced to print on large sizes of paper to get a close to full-page printout for their texts and image files. When a large size paper is used, users will have to cut the printout to the required size. This takes time and consumes resources.
So, for you to perform edge to edge printing tasks without the hassle that comes with printing on large size paper, you will have to change the default settings to allow printing files to the edge of the paper. Furthermore, it is important to ensure the file you are printing is not bigger than the printer paper when carrying out edge-to-edge printing. This will ensure a quality printout.
As discussed earlier, an alternative method you can use if your printer is cutting part of your image files off is to print on large printing sheets. When it comes out, you will have to trim the paper to size. This method is good but it is not cost-effective because resources get wasted. The process can also be time-wasting, so it is better to get a printer that can print to the edge. Make sure you check the printer specifications before getting printers for personal use.
Modern-day printers now perform a lot of tasks that go beyond printing documents alone. Printers are now used to print flyers, posters, business cards, invitation cards, banners, and photographs, etc. We believe this guide has provided all you need to know when it comes to borderless printing. The steps discussed in this guide are very effective if you follow them as directed.
Kindly share your thoughts and let us know if this guide was useful for your printing challenges.
 |  |  |  |

About Anthony Clark
Anthony Clark always had a passion for digital drawing and printing ever since he was young. He would wander around his parents' house in Phoenix, Arizona drawing various things with his older digital tablet. Be it just a memory collection or a portrayal of anything: objects, parents, school, events, etc. He received his BA in Graphic Design at San Jose State University - the heart of Silicon Valley. Now Mr. Clark is excited to present his experience coupled with some colorful dips to help shape the future of printing.
Thoughts on "How to Print to the Edge of Paper"
| | | |
Get some FREE Gifts. Or latest free printing books here.
Disable Ad block to reveal all the secret. Once done, hit a button below
| | | |